Hudson Configuration
Hudson is a extendable execution platform. Functionalities are extended via plugins.
By default only 4 plugins are installed, which supports
- CVS
- SVN
- Maven
- SSH
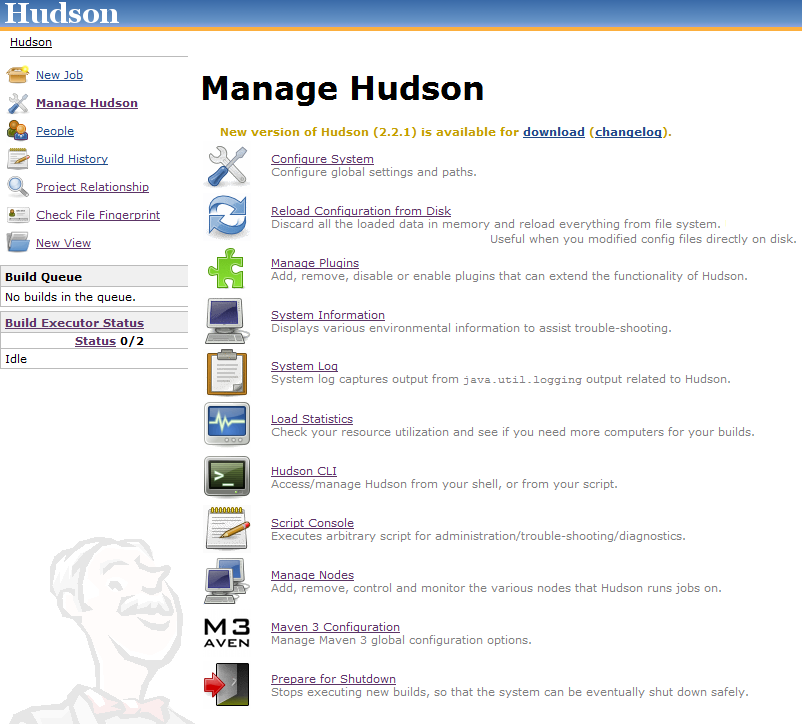
To configure Hudson, click on the Manage Hudson link in the left-hand navigation menu, then click on Configure System
Hudson security is enabled via Home -> Manage Hudson -> Configure -> Enable Security
Hudson can support one or more JDK installations used for running your builds. Setting up multiple JDK installs allows the configuration of different projects being built by different Java versions in separate jobs. You can use this to ensure e.g. that builds as well as test suites run fine on an older Java version to ensure compatibility. Another application would be to run with JDK versions supplied by different vendors.
The most common configuration of a JDK is to point to the already installed instance as used for running Hudson itself. This can be achieved simply by supplying a name like Open JDK 6 in the Name input field and the absolute path in the JAVA_HOME input field.
One of the main uses cases for Hudson is building projects with Apache Maven. As explained in more detail in Chapter 7, working with Apache Maven Builds the preferred way to build Maven projects is the Maven 3 integration. It comes with a bundled Maven 3 install so you do not actually need to install Maven 3 at all to get started. However if you want, you can install additional Maven 3 installs with the user interface displayed in below, "Configuring Maven 3 Installations".
The legacy Maven project type and Maven plugin use a separate installer as displayed in Figure 3.8, "Configuring Maven Installations". In addition to the same features as the Maven 3 installer it can be configured to download a Maven version from the Apache web site when required.
Both the Maven 3 and the Maven installation work in a similar way to the JDK and Ant installation options: Use an existing installation Specify a Name and add the path to your Maven install in the MAVEN_HOME input control.
Automatically install from Apache Select the Install automatically check box and Install from Apache in the drop-down and choose the Maven version, you wish to install. This option is only available for the Maven installation.
Automatically install from an archive file Select the Install automatically check box and Extract *zip/*.tar.gz and configure the installation.
Automatically install via a command Select the Install automatically check box and Run Command and configure the installation.
In general we recommend that you run your build using the latest Maven 3.0 release. With multiple Maven installations configured a drop down in the project build step configuration will allow you to choose the desired Maven version.
Maven 3 Builder Defaults
The Maven 3 integration allows for a set of default values to be defined that are used when a new build step for invoking Maven 3 is added. These values can be defined in the section Maven 3 Builder Defaults in the global Hudson configuration here. The individual fields and their purpose and usage
Global Properties Configuration
The global properties configuration allows the definition of key-value pairs that are exposed to all running builds as environment variables. Simply select the check box Environment Variables and add the desired name and value for the property in the interface displayed in "Configuring global properties".
CVS Configuration
Configure CVS executable with installation directory
Configuring E-mail Notification
Notification of build results and email-based notification specifically is a core feature of a continuous integration server. This configuration section as displayed in Configuring Email Notification allows you to configure the SMTP-related settings to connect to the server and send the emails.
Tip
In general it can be advantageous to configure all email recipients in Hudson as mailing list addresses. Combined with a mailing list management system available to your potential recipients e.g. development and QA team members, this setup allows users to join any mailing list and therefore notifications for specific jobs without any configuration changes on Hudson.
Configuring Email Notification
The following options can be configured:
SMTP Server
The SMTP server configuration is typically the IP number of the mail server or a fully qualified name including the domain e.g. smtp.example.com . If the mail server is reachable by host name or some alias e.g. hermes from the Hudson server you can use it as the SMTP server configuration.
Default user e-mail suffix
This suffix is appended to the Hudson user names used to log in to Hudson and the result can be used for e-mail notification. E.g. if the Hudson instance runs for example.com you could supply the suffix of @example.com. A Hudson user with user name jane.doe would then receive email notifications at the email jane.doe@example.com. This can be especially useful with security setups using an identity management system like LDAP for Hudson access as well as email address setup.
System Admin E-Mail Address
This is the email address used as the email sender in any E-mail notification sent by the server. When configuring this email you should either ensure that emails sent back as a reply are monitored by somebody or bounced by the server with some meaningful error message.
Hudson URL
The Hudson URL value will be used in the email notifications sent out to provide links to build results and so on. Provide a URL that will be valid for the audience of your notifications. If all recipients will be on an intranet or VPN you can use a non-public URL or IP number.
In addition to basic SMTP configuration parameters, you can click the Advanced Options button for further configuration that allows you to send email via servers that require authentication. Most SMTP servers will require at least user name and password to be accessed.
Use SMTP Authentication
Clicking on the check box will reveal User Name and Password input fields. Depending on the server configuration your user name will be just the log-in name or the full email address or either.
Use SSL
Select this check box if your SMTP server supports connecting with SSL activated.
SMTP Port
This configuration allows you to specify a custom port for the communication with mail server. If the field is left empty the default ports are used. These are 25 for SMTP and 465 for SSL secured SMTP. It is a common practice to configure a different port, so be sure to check with the administrator of the mail server what port you should be using.
Charset
The Charset configuration determines the character set used for the composed e-mail message.
Test configuration
Pressing this button will execute the current configuration for sending emails. Depending on your configuration and network setup you should receive an email after a short while.
E-mail Notification Via Gmail
In order to use GMail to send your emails you will need to configure the SMTP server to smtp.gmail.com. In addition you will have to have a Gmail account and provide the GMail e-mail address, or any other email address configured to be accepted in your Gmail account, as the User Name and configure the Password.
More can find out from here http://hudson-ci.org/docs/HudsonIntro.pdf
By default only 4 plugins are installed, which supports
- CVS
- SVN
- Maven
- SSH
To configure Hudson, click on the Manage Hudson link in the left-hand navigation menu, then click on Configure System
Configuring Hudson Security
Hudson security is enabled via Home -> Manage Hudson -> Configure -> Enable Security

Configuring JDK Installations
Hudson can support one or more JDK installations used for running your builds. Setting up multiple JDK installs allows the configuration of different projects being built by different Java versions in separate jobs. You can use this to ensure e.g. that builds as well as test suites run fine on an older Java version to ensure compatibility. Another application would be to run with JDK versions supplied by different vendors.
The most common configuration of a JDK is to point to the already installed instance as used for running Hudson itself. This can be achieved simply by supplying a name like Open JDK 6 in the Name input field and the absolute path in the JAVA_HOME input field.

Configuring Maven Installations
One of the main uses cases for Hudson is building projects with Apache Maven. As explained in more detail in Chapter 7, working with Apache Maven Builds the preferred way to build Maven projects is the Maven 3 integration. It comes with a bundled Maven 3 install so you do not actually need to install Maven 3 at all to get started. However if you want, you can install additional Maven 3 installs with the user interface displayed in below, "Configuring Maven 3 Installations".

The legacy Maven project type and Maven plugin use a separate installer as displayed in Figure 3.8, "Configuring Maven Installations". In addition to the same features as the Maven 3 installer it can be configured to download a Maven version from the Apache web site when required.
Both the Maven 3 and the Maven installation work in a similar way to the JDK and Ant installation options: Use an existing installation Specify a Name and add the path to your Maven install in the MAVEN_HOME input control.
Automatically install from Apache Select the Install automatically check box and Install from Apache in the drop-down and choose the Maven version, you wish to install. This option is only available for the Maven installation.
Automatically install from an archive file Select the Install automatically check box and Extract *zip/*.tar.gz and configure the installation.
Automatically install via a command Select the Install automatically check box and Run Command and configure the installation.
In general we recommend that you run your build using the latest Maven 3.0 release. With multiple Maven installations configured a drop down in the project build step configuration will allow you to choose the desired Maven version.
Maven 3 Builder Defaults
The Maven 3 integration allows for a set of default values to be defined that are used when a new build step for invoking Maven 3 is added. These values can be defined in the section Maven 3 Builder Defaults in the global Hudson configuration here. The individual fields and their purpose and usage

Global Properties Configuration
The global properties configuration allows the definition of key-value pairs that are exposed to all running builds as environment variables. Simply select the check box Environment Variables and add the desired name and value for the property in the interface displayed in "Configuring global properties".

CVS Configuration
Configure CVS executable with installation directory

Configuring E-mail Notification
Notification of build results and email-based notification specifically is a core feature of a continuous integration server. This configuration section as displayed in Configuring Email Notification allows you to configure the SMTP-related settings to connect to the server and send the emails.
Tip
In general it can be advantageous to configure all email recipients in Hudson as mailing list addresses. Combined with a mailing list management system available to your potential recipients e.g. development and QA team members, this setup allows users to join any mailing list and therefore notifications for specific jobs without any configuration changes on Hudson.
Configuring Email Notification
The following options can be configured:

SMTP Server
The SMTP server configuration is typically the IP number of the mail server or a fully qualified name including the domain e.g. smtp.example.com . If the mail server is reachable by host name or some alias e.g. hermes from the Hudson server you can use it as the SMTP server configuration.
Default user e-mail suffix
This suffix is appended to the Hudson user names used to log in to Hudson and the result can be used for e-mail notification. E.g. if the Hudson instance runs for example.com you could supply the suffix of @example.com. A Hudson user with user name jane.doe would then receive email notifications at the email jane.doe@example.com. This can be especially useful with security setups using an identity management system like LDAP for Hudson access as well as email address setup.
System Admin E-Mail Address
This is the email address used as the email sender in any E-mail notification sent by the server. When configuring this email you should either ensure that emails sent back as a reply are monitored by somebody or bounced by the server with some meaningful error message.
Hudson URL
The Hudson URL value will be used in the email notifications sent out to provide links to build results and so on. Provide a URL that will be valid for the audience of your notifications. If all recipients will be on an intranet or VPN you can use a non-public URL or IP number.
In addition to basic SMTP configuration parameters, you can click the Advanced Options button for further configuration that allows you to send email via servers that require authentication. Most SMTP servers will require at least user name and password to be accessed.
Clicking on the check box will reveal User Name and Password input fields. Depending on the server configuration your user name will be just the log-in name or the full email address or either.
Use SSL
Select this check box if your SMTP server supports connecting with SSL activated.
SMTP Port
This configuration allows you to specify a custom port for the communication with mail server. If the field is left empty the default ports are used. These are 25 for SMTP and 465 for SSL secured SMTP. It is a common practice to configure a different port, so be sure to check with the administrator of the mail server what port you should be using.
Charset
The Charset configuration determines the character set used for the composed e-mail message.
Test configuration
Pressing this button will execute the current configuration for sending emails. Depending on your configuration and network setup you should receive an email after a short while.
E-mail Notification Via Gmail
In order to use GMail to send your emails you will need to configure the SMTP server to smtp.gmail.com. In addition you will have to have a Gmail account and provide the GMail e-mail address, or any other email address configured to be accepted in your Gmail account, as the User Name and configure the Password.
More can find out from here http://hudson-ci.org/docs/HudsonIntro.pdf